So today I’m putting down the old paint, pencil, and brush to take up…
Pliers?
Yes, my dear friends, pliers.
But not just any old pliers… JEWELRY pliers. I have since finished (or at least finished what part of the series is out) a book series called the Parasol Protectorate by Gail Carriger, and it is a werewolf/vampire/saucy preternatural story set in a Steampunk world. (http://www.gailcarriger.com/index.php)
This book series, although I’ve done Steampunk before, has inspired me to create a Steampunk necklace out of watch parts. So, what is Steampunk, you ask? Well, let’s have Miss Carriger tell you that herself. Her explanation is here, and she’s so much better at explaining it than I.
 |
| Some pieces I've made before |
Let’s get started shall we! Here’s what you need:
Piece of velvet, black or dark green or dark blue (this is your work table. You’ll be able to see your beads and it gives you beads a rougher surface to sit nicely on. Otherwise your beads may roll off the table!)
A fabric tape measure or mini flexible tape measure (for, you know…measuring things.)
Jewelry pliers and cutters, preferably all smooth (you can usually get them in a set, mine are Craftsman)
 |
| The difference between smooth and ridged pliers. Ridged can tear up your metal. |
Wire (I’m using .020 in. diameter stainless steel because it’s thicker but still pliable)
Needle files (I have a Craftsman set)
Chain (any kind will do, it’s your artistic license at work, but make sure it fits with your jewelry piece!)
Jump Rings and Necklace Clasps (also listed under Findings)
Watch parts (or gears or whatever your little heart desires! But make sure it has holes to put your wire though! And that your wire fits!)
Optional: Assorted beads or embellishments (I’m leaving those out for right now)
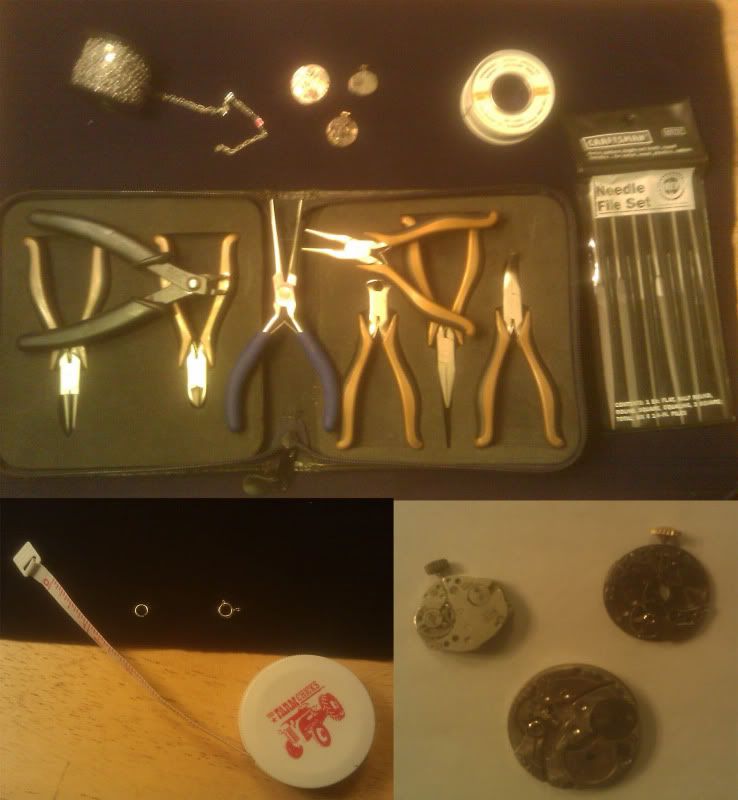 |
| All the tools you should need |
This project should take you about a half hour to an hour to complete, depending on how much embellishment you want and your level of proficiency. You can find all these and probably the watch parts at a local jewelry supplier or craft store. You can also go online and look for them. Some good sites are artbeads.com and my favorite rings-things.com. The watch parts will probably be easiest to find online, but do look around or put an ad on Craigslist, because you never know what you can find for cheap!
Let’s Start!
1) Measure out chain and wire.
You want to measure out how long you want your necklace to be. This is why I said a flexible fabric tape or mini tape, because I’m going to take my measuring tape and put it around my neck. I’m then going to measure where I want the pendant to fall and take that measure.

I measured this one at 22in. so I’m now going to cut my chain that size. It’s ok if it’s not perfect, you can readjust as needed, but always remember: too long is way better. If you cut something too short, then you usually can’t add the length back on if you need it.
Cut the wire at your desired length. I’m wrapping my wire around a few times, so I gave myself 10 in. but you can do less or more. Just remember: too long is way better.
2) Attach your clasp.
Now you want to create the base necklace. Take your clasp and jump ring and using smooth pliers, bend them open. You ABSOLUTLY DO NOT want to pull them apart!! What I mean by this is taking the pliers and TWISTING the metal to the SIDE rather than BENDING STRAIGHT apart. If you pull the metal apart, rather than twist to the side, it will weaken the metal and your jump ring will break. Sometimes, you might need to push the metal in, but do so very very VERY gently. It doesn’t take much pressure to bend things out of proportion.


Once you have opened the rings, take the ends of your chain and hook them on to each ring. Then close the rings by twisting them back into place. If the ring ends don’t meet up just right, then take a large flat smooth pliers and VERY GENTLY, with a small pulsing motion, bend the edges in towards each other. As I said before, you want to try not to bend the metal, but sometimes you have to. You have now completed a basic necklace! (For a super easy multi necklace, buy bigger jump rings and clasps and cut 3-4 pieces of chain, each one about 1-2in. smaller than the next, place each chain end on the jump rings in length condescending order, and you have 1 necklace that looks like 3 or 4!)
3) Prepare your wire

To start, take your wire at the very middle and give the sides a little twist. This will begin to create the loop that will attach the pendant to the necklace. Don’t twist too much though, because you are now going to slip the chain into the loop.

Give the loop a few turns to seal it and you’re ready to start the pendant!

4) The Pendant
I have two holes on the side of my piece that I’m placing my wire ends into.

On your piece it may be different, so just go with the flow of your piece, as you may be wrapping your wire around a gear shaft rather than putting it into a screw hole like mine. (yes, children giggle all you want, I didn’t make up these names…) you may or may not have to file the holes to make them just a tad bigger. I had to, and it’s easier to pull the wire through. Pull the wire through until you are even and almost up to your first loop.

Take one wire end and bring it up towards the top loop.

Now this next part involves twisting the wire end around that same wire, thus creating another loop. Be extremely gentle. Take the wire end and continue to wrap till it’s done. Use the pliers as needed to obtain the desired tightness in the wrap.

You can also press the spiral tighter by taking your flat smooth pliers and pressing the spiral together.

If you have a big enough spiral, on your last loop, try to “tie a knot” in your metal. Basically, put as little excess end into the spiral you just created. If you don’t have enough end or your spiral is too tight, don’t worry about it. Just get the end as close to the wire as possible and file till it’s smooth. You don’t want a pokey end that can snag on your clothes or skin, and both of these ways are good ways to make sure that doesn’t happen.

Do this process to the other wire and you’re done!
WHEW! FINISHED! Now go forth and wear your Steampunk necklace with pride!

That's awesome! Great tutorial, and the necklace looks fantastic (and the little gear-piece earrings? Too cute!).
ReplyDeleteGoing back to that whole "inspiration" part... The fact that you took the time to put up a whole tutorial about how to make one is kinda inspiring me to find older watches so I can make one of my own. <3 it!
ReplyDeleteThat's the plan my dear briannemd!
ReplyDeleteI wish to inspire art as well as create it, because a world without art, no matter what medium, word, or music, is just wrong.
Hey Melissa,
ReplyDeleteThis is Tina Johnson (we were in 19th century art together) I love love LOVE the watch jewelry!!
TOTALLY AWESOME!
<3